

How To Draw Supply And Demand Zones
The law of supply and need governs all marketplace prices. Supply & need zones put the economic theory into a trading strategy using price charts. Read on to learn more than about Southward&D trading... Supply and demand zones are a popular assay technique used in day trading. The zones are the periods of sideways price activeness that come before explosive price moves, and are typically marked out using a rectangle tool in the stocks, forex or CFD trading platform. A supply zone forms before a downtrend Supply and Demand trading strategies use toll returning to these zones equally entry and go out criteria. The strategy is market place-neutral - significant it tin be traded in forex markets, article futures, index CFDs etc. You can skip ahead to see how to draw the supply and demand zones for twenty-four hours trading strategies Only we'd recommend a quick background on the investment theory to give you confidence in why this trading strategy works beginning… The candlesticks or confined that mark the origin of a stiff downtrend are called the supply zone or distribution zone. The candlesticks or bars that marker the origin of a strong uptrend are chosen the demand zone or accumulation zone. Permit's think about the iii simplest concepts in trading financial markets Financial markets move in phases of the above. In that location are uptrends and downtrends or cost ranges. Richard Wykoff was i of the first market analysts to explain the interaction of these phases, giving them four labels. They can be seen in Wykoff'southward classic schematic of market activeness: Information technology is in the agreement of Wyckoff'southward explanation of market place price action, that supply and demand zones are also known as aggregating and distribution zones. Wykoff explained these phases by the action of the 'whales' which these days are big institutions similar money centre banks in forex markets or hedge funds in the stock market. These big players tin't just put their whole lodge into the market at once considering they are accumulating and so much that it would move the price. And so instead, they purchase increments within a specified price range. This causes what we meet on the chart equally a 'demand zone' As, when they are selling their position, it can't be all done at once because the selling pressure would ship the price sharply lower and reduce their profits because they would be forced to sell into a market reject, caused past their own big orders. And then once more they sell over a period of time to minimise the market impact of their trades, which creates the 'supply zone'. Eventually the marketplace will intermission in the mode that these whales had been ownership or selling, creating a period where supply and need are out of balance i.e. a cost trend. Commencement, it'southward important to sympathise that in that location can be several periods of accumulation during an uptrend and several periods of distribution during downtrends. This means that, just similar in classic technical assay toll patterns, there are supply and demand reversal patterns and supply and need continuation patterns. The Drop-Base-Rally is a bullish reversal pattern The Rally-Base-Drop is a bearish reversal blueprint The Rally-Base-Rally is a bullish continuation design The Drop-Base-Rally is a bearish continuation pattern This is of import because understanding which stage the market place is in i.due east. what is the underlying trend and how long has information technology been in identify determines which are the best demand and supply zones to look for. In an old trend, you lot volition desire to look for reversals. In a new trend you will desire to look for continuations. Putting this theory into practise, the idea is to notice the place on the chart where demand overcame supply (for long trades) or where supply overcame demand (for short trades). Let's go through the process for correctly identifying supply and need zones. Let's elaborate on Stride five, which concerns how to depict supply and demand zones. At that place are two types of candle zones to await for on the nautical chart, either one will keep a big toll motion. In trading terms, a base of operations is typically another way of referring to a bottom. But in the context of supply and demand, a base of operations ways a small series of candles (typically less than ten) in a tight consolidation. This is simply when i candle is enough to describe the zone. The two candlesticks together oft class a classic Japanese candlestick pattern like a hammer or shooting star or bullish and bearish engulfing candlestick patterns. Similar in any form of technical analysis or trading strategy, there are potent signals and weak signals. To get the best trading results, we demand to ignore the weak signals and take the strong ones. The perfect supply and demand merchandise setup will run across the zone exhibiting all of these features: If the trading range that exceeds the breakout is also broad or has likewise many long-wick candles, it shows uncertainty and is less likely to represent accumulation from a whale. The demand or supply zone should ideally exist between 1 and ten candles. Accumulation and distribution can take a while but too long and the zone may get wearied earlier the re-test later on. What we desire to encounter in the breakout candle is an 'Extended range candle' or ERC. This shows a strong cost motility that has significance. The all-time zones are when the price has not revisited it since the breakout. Just like support and resistance, the more times supply zones and demand zones are exam, the more likely they are to neglect. This is when the price temporarily breaks out in the opposite direction but so chop-chop reverses. This is a sign of large players 'stop hunting' to find extra liquidity for their accumulation or distribution. It'due south possible to buy supply and demand indicators that have been custom congenital for the trading platform. However, cartoon supply and need zones tends to exist more than of an art than a science and some of the best-known modern supply/demand traders and mentors like Sam Seiden draw the zones using the 'rectangle tool' available in almost trading platforms, including the FlowBank Pro Trading Platform, which is bachelor on PC, Mac and Mobile devices. Supply and need zones are typically drawn close to support and resistance levels (S&R levels) but are not quite the aforementioned. Support is drawn at the depression of a candlestick that has had at least ii candlesticks with higher lows on either side. Resistance is drawn at the high of a candlestick that has at least 2 candlesticks with lower highs on either side. Using supply and demand zones every bit part of a trading strategy means involving other trading methodologies also as a sound risk management system. Here nosotros are using the change in trend shown by the moving average to add extra importance to the need or supply zone as well as to set the direction of the trade Cheers for reading! To examination your supply and demand trading skills, click hither register for a costless demo trading account from FlowBankContents: Supply & Demand Zones
What are supply and demand zones?
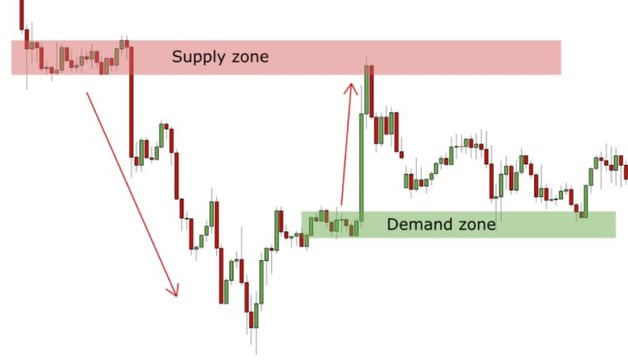
A demand zone forms earlier an uptrend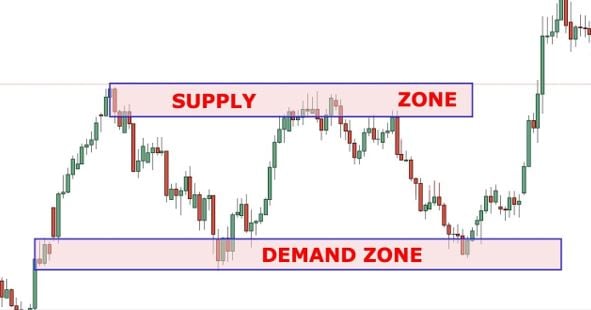
What are zones in trading?
What is a supply zone?
What is a demand zone?
Wykoff & Market Structure
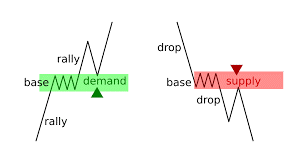
Types of supply and need patterns
S&D Reversal Patterns
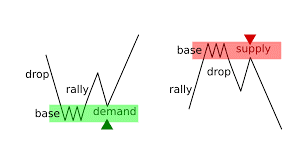
S&D Continuation patterns
How do you marking a supply and demand zone?
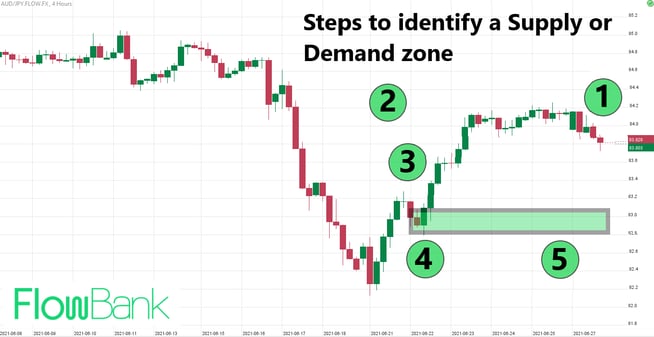 Source: FlowBank Pro Trading Platform
 Pace ane: Place current market place toll
Step 2: Expect left on the chart
STEP 3: Look for big green or big red candles
Stride iv: Find the origin of the big candles
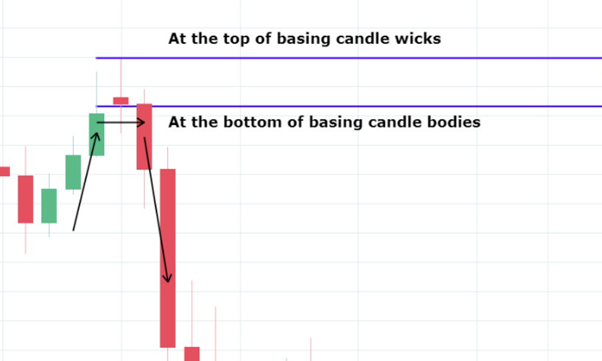
STEP 5: Mark the zone effectually this 'origin'
How to draw Supply & Demand Zones
Supply/Demand Base
Unmarried Japanese Candlestick
How practice you identify a strong supply and demand zone?
Supply and Demand Zone indicators
Supply and need vs Support and Resistance
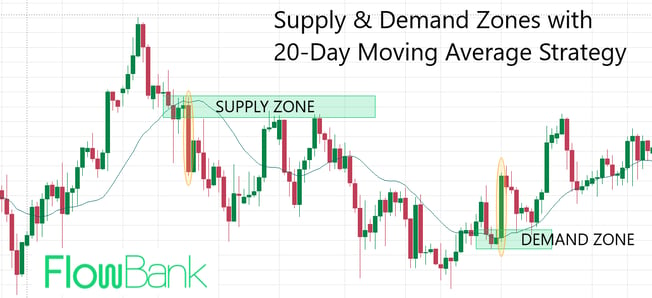
Supply and demand trading strategy
Instance: The S/D with 20 DMA Strategy

Source: https://www.flowbank.com/en/research/price-action-trading-strategy-supply-demand-zones
Posted by: mitchelljohicad1985.blogspot.com
0 Response to "How To Draw Supply And Demand Zones"
Post a Comment